Whether you’re creating a new website or redesigning an existing one, WordPress themes make it quick and easy to add character to your site.
WordPress themes are templates and stylesheets created by web designers and developers that are available to download directly to your site. They cut out the difficult parts of website design, like coding, so you can focus on creating and publishing engaging content.
What is a WordPress Theme?
First, let’s start with the definition. A WordPress theme is a bundle of modifiable template files that gives a consistent design to a WordPress site’s visual interface without altering its core features.
WordPress themes are plentiful to cater to all sorts of user preferences and needs. Hence why each of them comes with a design that is customizable by modifying its code, inserting widgets, or adding plugins – making the possibilities endless.
Regardless of the niche of your website, you will surely find the right choice. WordPress has themes for every site – from ecommerce to food blogs.
Things to Consider Before Installing a WordPress Theme.
Having a fitting theme is essential since it isn’t just about the skin-deep elements of your website, but also the way visitors interact with it. Hence why you should take these factors into account.
Choosing the Perfect Fit for Your Site
As there are countless WordPress themes, either official or from third-party providers (e.g., Elementor or Astra Theme), selecting it could be tricky. But there are criteria you can consider to weed out your options fast.
some themes are made for specific niches (restaurant themes, business themes, etc.), while others are multipurpose. Therefore, the first thing you have to decide is the focus of your website. We suggest picking something that defines its aim the best.
Another aspect you may want to consider is the design, as it concerns elements like colors, layouts, fonts, and whether it is easy to navigate. You can use other blogs as inspiration for starters.
3 Ways to Install a WordPress Theme
Now, let’s go to the specifics on how to install a WordPress theme. There are four ways you can go about it:
Method 1: Installing from the WordPress Theme Directory
Note that this method is only limited to the free selections in the WordPress Theme Directory. If that is not an issue to you, follow these steps:
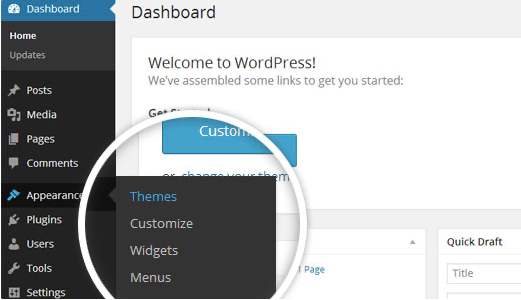
From your administrator area, hover above Appearanceand then click Themes. Next, select Add New.
Afterward, click Feature Filterto help you sort out choices.
Once you have checked all the boxes of your criteria, press Apply Filter. Hover above your theme of choice and select Install to do so, then Activate. After you’ve done it, you will see “New theme activated” notification. From there, you can click Visit site to see its appearance live.
Method 2 : Install WordPress Themes Using Upload Method
You can easily upload a premium or custom theme in the WordPress dashboard with just a few steps.
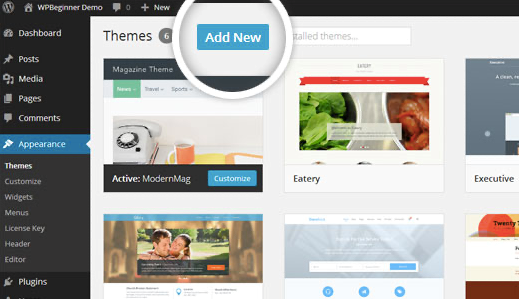
First, download the .zip file you bought in the theme marketplace or commercial provider. Then, log in to your WordPress account and go to Appearance in the menu on the left of the dashboard and select Themes.
On the themes page, select Add New at the top of the page.
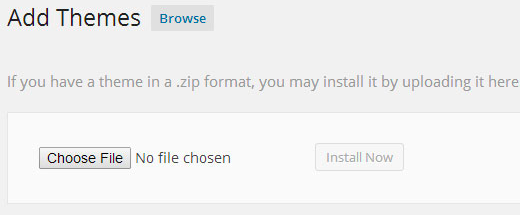
After clicking on the Add New button, select the Upload Theme button.
After selecting Upload Theme, click Choose File. Select the theme .zip folder you’ve downloaded, then click Install Now.
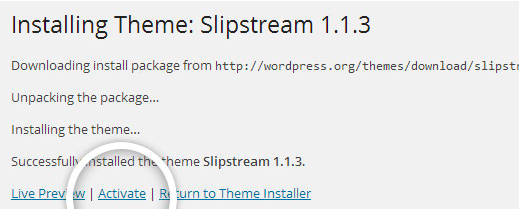
After clicking Install, a message will appear that the theme installation was successful. Click Activate to make the theme live on your website.
Method 3 : How to install WordPress themes using FTP
If you have a WordPress theme on your local computer, it’s possible to install it using File Transfer Protocol (FTP). By using this method there is a risk of deleting or modifying files, which could bring your site offline. For this reason, we advise that only advanced users install themes this way. To use the FTP to add new themes manually, follow these steps.
To begin, you must have an FTP hostname, username and password, and an FTP client. We’ve used FTP client Filezilla to show the steps in this tutorial.
Launch Filezilla, enter your login details and click Quickconnect.
The following window contains Remote Site and a root directory (the root directory is your site’s name). Select /rootdirectory/web/content/wp-content/themes.
In the Local Site window, select the folder containing your saved theme, right click for more options and hit Upload.
You’ve now successfully uploaded your theme to WordPress. To finalize, log in to your control panel, head to Appearance > Themesand hover your mouse over the new theme. Now click Activate.
You’ve now successfully uploaded your theme to WordPress. To finalize, login to your control panel, head to Appearance > Themesand hover your mouse over the new theme. Now click Activate.
All that’s left is to check out your new theme and see how you like your new site design.
Conclusion :
Adding a theme to your WordPress website is exciting. You’ll get a brand new look, and plenty of options to play with and elements to personalize. Of course, to get there you’ll first need to know how to install and activate your theme.
Your visitors should be able to tell your website’s intent at first sight. Achieve it by using templates that are aesthetically-relevant, pleasing to the eyes, and easy to navigate.
However, you also have to make sure that it is configurable, responsive, plugin-friendly, and light.
In this article, we have learned how to install a WordPress theme in three methods:
Using WordPress directory (free themes only)
Manual upload
FTP upload
Hopefully, this guide is useful next time you want to give your site a sleek makeover!